
AgilityWriter MCP Connector Guide
Updated August 22, 2026 · Adam Yong
Connect AgilityWriter to Claude, ChatGPT, Cursor and other AI assistants. Once connected, you can research and write SEO articles, polish content you already have, and browse your article library by simply chatting with your AI assistant. No dashboard needed.
If you use projects, one sentence is enough: “write an article about X for project Y” applies that project’s saved settings automatically.
1. Why not just ask ChatGPT or Claude to write it?
Because your AI assistant writes from memory, and Google ranks evidence.
Ask ChatGPT or Claude for an article and you get one writing pass from the model’s general knowledge: no live research, no look at what already ranks for your keyword, and no sources you can point to.
It reads well, but it is not connected to the search results page you are trying to win.
Ask the same assistant to “write it with AgilityWriter” and the article is built the way an SEO team would build it:
- Live search research first. AgilityWriter runs the real Google search for your keyword, reads the top-ranking pages, and captures Google’s AI Overview along with the sources it cites. Your article starts from what is winning today, not from what the model remembers.
- Competitor-driven coverage. It extracts the entities and subtopics the ranking pages actually cover, so your article competes on completeness instead of guesswork.
- Written section by section, from the evidence. Each heading is written against the research, facts are tracked so they are not repeated, and citations are added from the sources it fetched.
- Over a hundred AI calls per article, not one. A typical article is the product of 60 to 150 model calls: research, outlining, per-section writing, and cleanup. That is not something one chat prompt can replicate.
- The SEO deliverables come with it. Meta title and description, FAQ section, key takeaways, optional AI images, and ready-to-post social copy, saved to your AgilityWriter library like any article you create in the dashboard.
- Receipts on demand. Ask “show me the research behind this article” and you get the competitor pages it read, the keywords it targeted, and the facts it gathered. A chat-written article cannot show its work.
You also keep everything your assistant is good at.
It can research with its own tools first and inject those findings into specific sections of the article (the Power-Up feature), apply your project’s saved settings, watch the generation, and hand you the finished piece, all in one conversation.
It is also the easiest way to use the settings that matter most. The options that improve an article the most are the ones people skip, because they are fiddly to set up by hand.
Power-Up is the clearest example: in the dashboard you write the instructions for every heading yourself, and they have to match the article’s outline exactly. In chat you just ask for it, and your assistant drafts those instructions against the outline it generated, checks them before any credits are spent, and applies them.
Project settings, readability, writing style and negative keywords work the same way: describe the result you want and your assistant fills in the settings behind it. A fully tuned article stops being a form-filling exercise and becomes a sentence.
The assistant supplies the judgment; AgilityWriter supplies the evidence and the production line.
When a plain chat answer is the right tool: a quick paragraph, a social caption, a rough draft, or anything that does not need to rank.
AgilityWriter costs credits and takes a few minutes because it does real research. Use it when the article is meant to compete in search.
2. Before you start
You need two things:
- An AgilityWriter account on any paid plan. The MCP connector works on every paid plan, including Basic. Trial accounts are not included, and access ends when your subscription period ends. If you cancel, the connector keeps working until the end of the period you have already paid for. (Note: the direct REST API still requires the Standard plan or above. MCP is the broader of the two.)
- Your AgilityWriter API key. Find it in your AgilityWriter dashboard. Treat it like a password: anyone with the key can spend your credits.
Connector address: https://mcp.agilitywriter.ai/mcp
3. How to connect
Claude (claude.ai website) and Claude Desktop
- Go to Settings, then Connectors.
- Click Add custom connector.
- Fill in:
- Name:
AgilityWriter - Remote MCP server URL:
https://mcp.agilitywriter.ai/mcp?api_key=YOUR_API_KEY(replaceYOUR_API_KEYwith your actual key) - Leave the OAuth fields empty.
- Click Add.
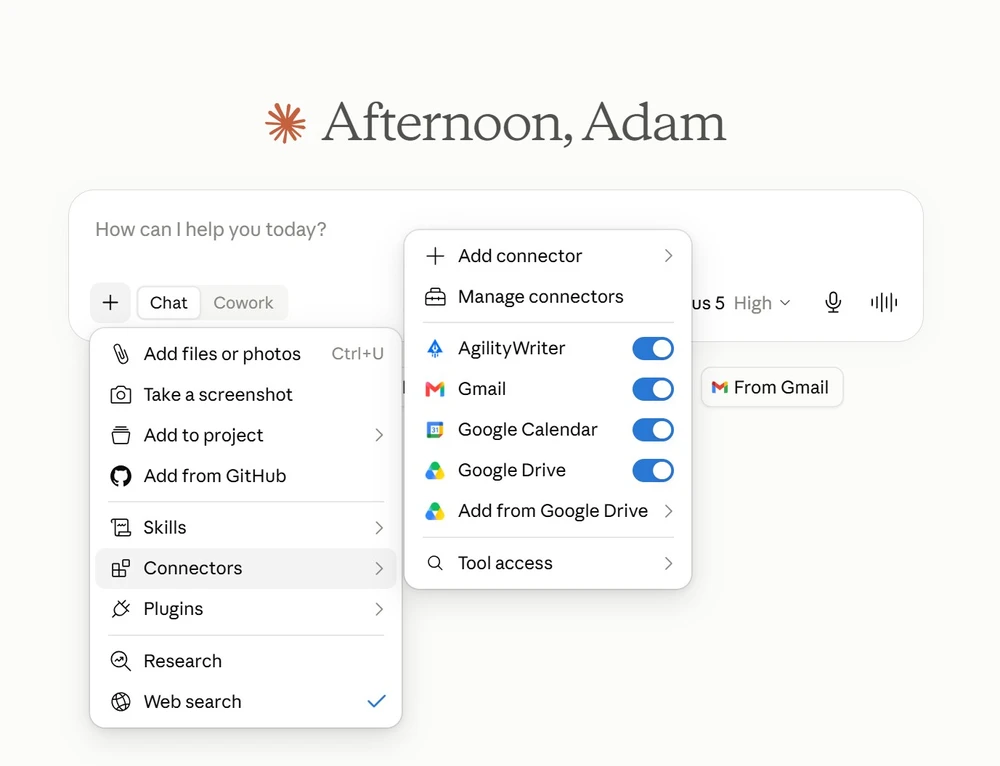
- In a new chat, open the search and tools menu (the sliders icon near the message box) and make sure the AgilityWriter tools are enabled.
Claude Code (terminal)
Run this once, replacing YOUR_API_KEY:
claude mcp add --transport http agilitywriter https://mcp.agilitywriter.ai/mcp --header "Authorization: Bearer YOUR_API_KEY"
By default this adds the connector to the folder you are currently in. Add --scope user straight after the name to make it available in every project instead:
claude mcp add --transport http agilitywriter --scope user https://mcp.agilitywriter.ai/mcp --header "Authorization: Bearer YOUR_API_KEY"
Check it worked with claude mcp list. AgilityWriter should show as connected.
VS Code (Claude Code extension)
The Claude Code extension shares its configuration with the Claude Code command line tool, so you add the connector with the same command and it works in both.
- Install the standalone Claude Code CLI if you have not already. Installing the extension on its own is not enough: it keeps its own private copy of the tool, so the
claudecommand will not exist in your terminal until you install the CLI separately. - In VS Code, open the integrated terminal with
Ctrl+`(Windows/Linux) orCmd+`(Mac). - Run this once, replacing
YOUR_API_KEYwith your real key:
claude mcp add --transport http agilitywriter --scope user https://mcp.agilitywriter.ai/mcp --header "Authorization: Bearer YOUR_API_KEY"
- Open the Claude Code panel and type
/mcp. AgilityWriter should show as connected.
--scope user makes the connector available in every project you open in VS Code.
Leave it out and it is added only to the folder you happened to be in when you ran the command, which is the usual reason the tools seem to vanish when you switch projects.
The command saves whatever key you give it without checking it first, so a typo or a leftover YOUR_API_KEY placeholder is accepted at this step and only shows up later as failed in the /mcp panel.
If that happens, run the command again with the correct key.
Cursor
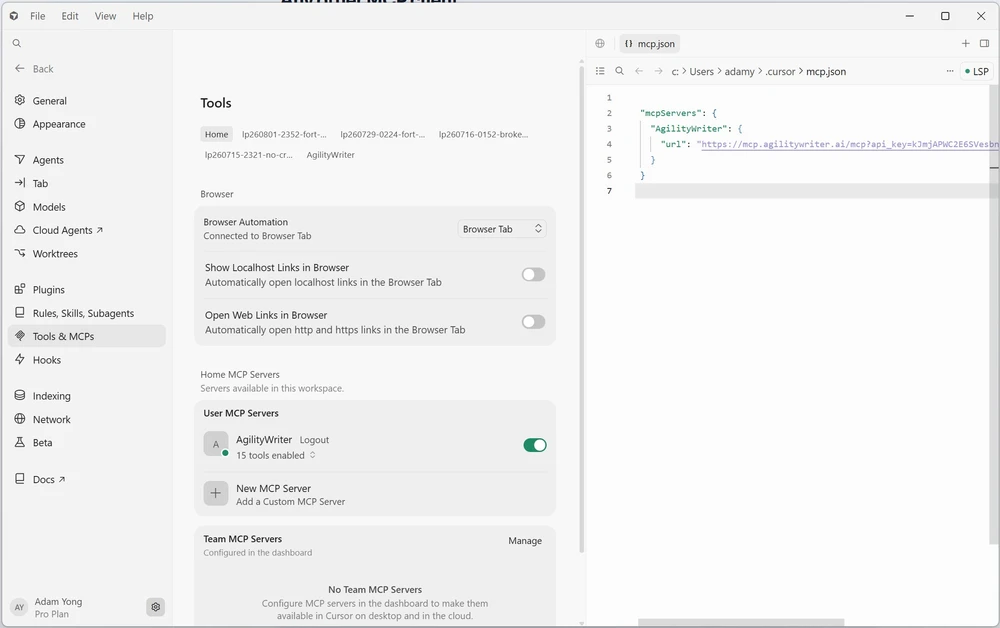
Edit your MCP config file (Settings → Tools & MCPs, or open ~/.cursor/mcp.json directly) and add:
{
  "mcpServers": {
    "agilitywriter": {
      "url": "https://mcp.agilitywriter.ai/mcp",
      "headers": {
        "Authorization": "Bearer YOUR_API_KEY"
      }
    }
  }
}
If your Cursor version does not support the headers block, use the URL form instead and omit headers entirely:
{
  "mcpServers": {
    "agilitywriter": {
      "url": "https://mcp.agilitywriter.ai/mcp?api_key=YOUR_API_KEY"
    }
  }
}
Save the file, reload the window (Ctrl+Shift+P → Reload Window), then check the server is enabled under Tools & MCPs.
ChatGPT
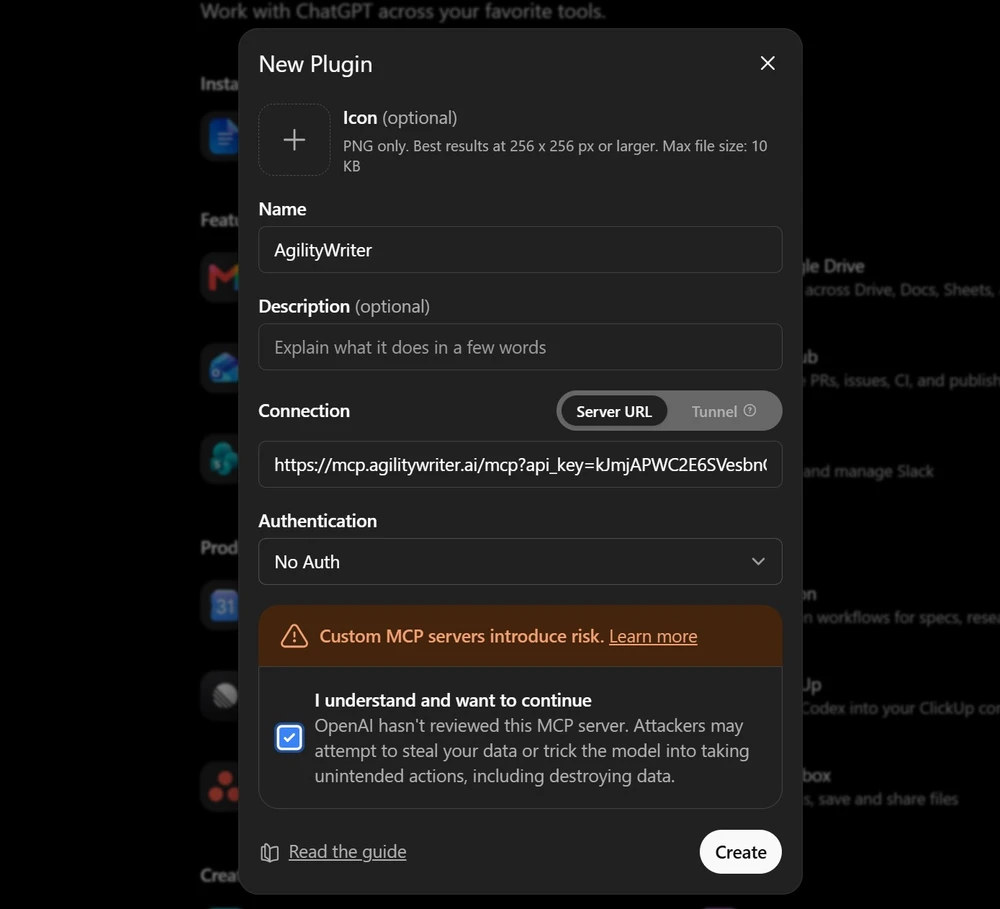
- On chatgpt.com, go to Settings, then Plugins, then Browse Plugins.
- Click the + icon to add a new plugin.
- In the New Plugin dialog, fill in:
- Name:
AgilityWriter - Connection: leave this set to Server URL (not Tunnel)
- URL:
https://mcp.agilitywriter.ai/mcp?api_key=YOUR_API_KEY(replaceYOUR_API_KEYwith your actual key) - Authentication: No Auth. Your key is already in the URL, so there is no separate credential to enter.
- Icon and description are optional, leave them blank if you like.
- Tick I understand and want to continue under the custom MCP server warning.
- Click Create.
Note: if the form asks for a “Bearer token env var”, it wants the name of an environment variable, not the key itself. Either set an environment variable and give its name, or use the URL form above.
Any other MCP client
Three authentication styles all work, so use whichever your client supports:
| Style | Value |
|---|---|
| Header | Authorization: Bearer YOUR_API_KEY |
| Header | X-Api-Key: YOUR_API_KEY |
| URL only | https://mcp.agilitywriter.ai/mcp?api_key=YOUR_API_KEY |
4. Check that it works
Start a new chat and type:
Check my AgilityWriter account.
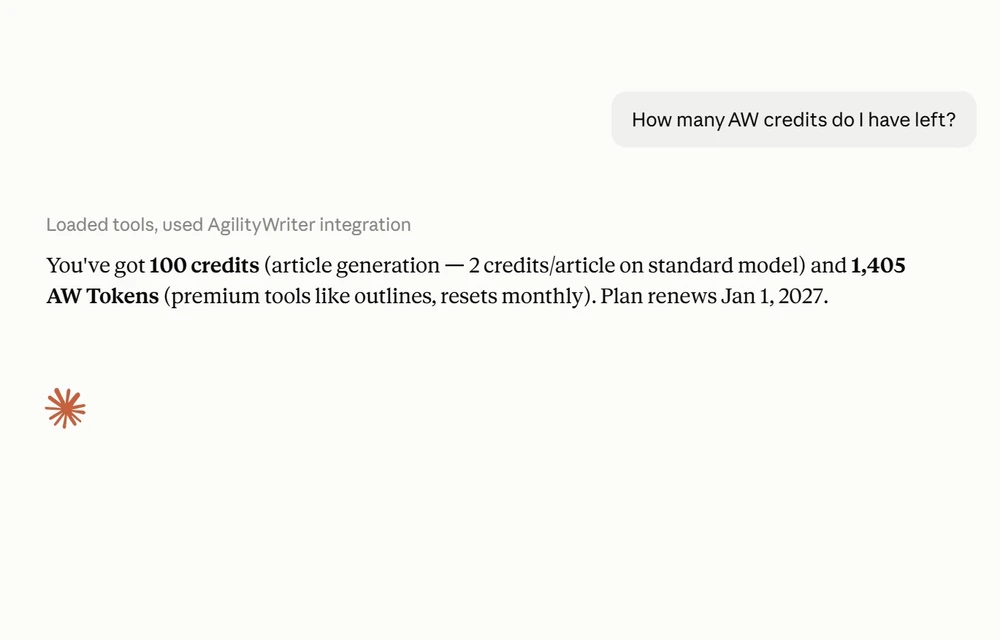
You should get your account email and confirmation that your plan is active. Then:
How many AgilityWriter credits do I have left?
If both answer correctly, you are fully connected.
Tip: you can say “AW” instead of “AgilityWriter”: the connector understands it. “Write an AW article about…” works fine.
5. What it costs
AgilityWriter uses two separate balances, and they are not interchangeable:
- Credits pay for articles. They come with your plan.
- AW Tokens are a monthly allowance for premium tools, and reset each month.
| What you ask for | Costs |
|---|---|
| A new article, default smart settings | typically 4-5 credits (premium AI model plus 3 AI images, see section 6) |
| A new article, standard model and no images | 2 credits (just ask for it that way) |
| A business or service page | 2 credits |
| Rewriting a URL or YouTube video | 2 credits |
| Polishing content you already have | 1 credit |
| An article outline | 1 AW Token |
| Checking status, fetching articles, reading project settings, browsing your library | free |
Just ask “how many credits do I have?” at any time. Your assistant can also tell you what something will cost before you commit to it.
If a generation fails, the credits are automatically refunded and your assistant will tell you.
6. How the connector fills in the details
You never need to specify every setting. When you leave something out, the connector fills it in using three layers, in this order:
-
What you say always wins. “Use the standard model”, “no images”, “British English” or any other instruction overrides everything below.
-
Your project’s saved settings. If you name a project (“write it for my CoolFlow HVAC project”), that project’s settings are applied automatically: language, region, tone of voice, audience, point of view, writing style, readability, business name and background, negative keywords and internal links.
This is the same information you saved under Settings, then Projects in the dashboard, so articles written in chat match the ones you create there.
-
Smart Writer defaults. Anything still unset gets the same defaults as the Smart Writer wizard in the dashboard: the current premium AI model, 3 AI-generated images, easy-to-read 7th-grade readability, and a natural writing style.
These defaults are what make the typical article 4-5 credits; say “standard model, no images” if you want the 2-credit version instead.
After creating an article, your assistant can tell you exactly which settings came from the project and which came from the smart defaults.
Deep research is opt-in for a reason. The in-depth research modes read sources far more thoroughly and make generation take considerably longer, so your assistant only uses them when the topic genuinely needs them (health, finance, legal, technical or statistics-heavy subjects) or when you ask: “write it with in-depth research and citations”.
Outlines work the same smart way. If you have not given an outline, your assistant can generate three researched outline versions first (1 AW Token), compare them, pick or merge the best one, and then write the article from it.
If you paste your own outline, it is used as-is. You can also skip outlines entirely and let AgilityWriter build one internally for free.
One thing that is never automatic: if your project has a saved Power-Up template (the per-heading instructions), your assistant will not apply it blindly, because it has to match the article’s actual headings.
Ask for it: “use my project’s power-up template” and your assistant will fetch it, adapt it to the outline, and apply it.
7. What you can do
Writing
| You ask for | Tool | Notes |
|---|---|---|
| A new SEO article | create_article | 3-10 minutes. Researches live search results first. Name a project and its settings apply automatically |
| A business or service page | create_webpage | For “plumber in Dallas” style pages, not blog posts. Also project-aware |
| An article from a web page or YouTube video | rewrite_from_url | Paste any URL |
| An outline first, to review before committing | create_outline | A minute or two. Generates three versions; your assistant compares them and picks the best |
Improving what you already have
| You ask for | Tool | Notes |
|---|---|---|
| Rewrite and fact-enrich existing content | polish_article | Works on any pasted content, not just AgilityWriter articles |
| Check on a polish job | get_polish_status |
Finding and checking
| You ask for | Tool | Notes |
|---|---|---|
| Is my article ready? | get_article_status | |
| Is my outline ready? | get_outline_status | |
| Give me the finished article | get_article | Full HTML, meta title and description, image, social posts |
| Search my past articles | list_articles | ”What did I write last week?” |
| Show the research behind an article | get_article_research | The competitor pages it read, the keywords it targeted, the facts it gathered |
| My projects | list_projects | |
| A project’s saved settings | get_project_settings | See what will be applied before you write, including any Power-Up template |
| My connected WordPress sites | list_sites | The sites an article can be published to. Sites are connected by installing the AgilityWriter WordPress plugin, not from chat |
| My account | check_account | |
| My balances | check_credits |
Articles run in the AgilityWriter queue exactly like articles created from the dashboard, appear in your dashboard as usual, and typically take 3 to 10 minutes.
Your assistant will wait and check the status for you, including a live progress percentage.
If the queue is busy, generation can take longer, sometimes hours. Nothing is wrong and nothing is lost: the article keeps generating on its own, and your assistant will stop watching and tell you to check back instead of waiting forever.
Later, just ask “is my article ready?” in any chat, or open the article list in your AgilityWriter dashboard.
8. Sample prompts
Getting started
Check my AgilityWriter account and tell me how many credits I have.
List my AW projects.
Writing for a project
Write an AW article about “AC tune-up costs” for my CoolFlow HVAC project. (That’s the whole prompt. The project supplies the language, region, tone, business background and the rest; the smart defaults cover the AI model and images.)
Show me my CoolFlow HVAC project settings before we start.
Write an article about “signs your AC compressor is failing” for CoolFlow HVAC, but in British English this time. (Anything you say overrides the project’s saved setting.)
Write an AW article about “spring AC maintenance checklist” for CoolFlow HVAC using my project’s power-up template.
Writing an article
Write an AW article titled “10 Best Coffee Shops in Austin” in my CafeBlog project. Region US, American English, around 1500 words.
Write an AW article about “budget travel in Vietnam”, region US. Standard model, no images, keep it to 2 credits.
Create an article about “how to choose a standing desk” for my Office project. Friendly tone, written for first-time buyers, target the keyword “best standing desk”, and include a FAQ section.
Write an article about heat pumps at a 7th-grade reading level, and don’t use the words “delve”, “tapestry” or “testament”.
Write an article about our software and link to these pages of ours: [paste URLs].
Write an article about home solar using news from the last month only, and add images.
Using your own information
This is where the connector is strongest: anything you tell your assistant can be fed into the article as fact.
Here are our product specs, pricing and warranty terms: [paste]. Write an AW article about choosing a water filter that uses these as the source of truth.
Research the 2026 EV tax credit rules, then write an AW article about them, and put the figures you found into the relevant sections so the article is written from that evidence.
The second prompt uses the Power-Up feature: your assistant researches first, then attaches its findings to individual headings, so each section is written from real evidence rather than general knowledge.
Pages and rewrites
Write a service page for my plumbing business, Acme Plumbing in Dallas. We do emergency callouts 24/7, 20 years in business, free quotes.
Turn this YouTube video into an article for my Reviews project: [paste URL]
Improving existing content
Here’s a blog post I wrote two years ago: [paste]. Polish it: enrich it with current sources, make it easier to read, and keep my voice.
Working with outlines
Create an AW outline for “Complete Guide to Email Marketing” with 8 main headings, region US. Show me all three versions and tell me which one you’d pick and why.
I like that outline, but merge the last two sections. Now write the full article with it.
Outlines use a special numbering format: numbered lines (“1.”, “2.”) are main headings, lines starting with ”-” are subheadings, the first line is “1. Introduction”, and you can end a line with “[Table]” or “[List]” to force that layout.
Your assistant knows this and keeps the format automatically; the numbers and the Introduction heading are removed from the finished article for you.
Create an outline for “beginner woodworking projects”, pick the best of the three versions yourself, and write the article from it.
Your library
What AW articles did I create last week?
Find my article about standing desks and show me the meta description.
Which of my articles are still generating?
Show me the sources AgilityWriter used for article 12345, and whether it covered the topics competitors rank for.
Combining with your assistant’s own skills
Write an AW article about “spring cleaning checklist”, then suggest 5 title variations I could A/B test.
List my projects, then write one short article for each active project about its main topic. Ask me to confirm before creating each one.
Get the finished article, then give me the LinkedIn post and X post for it. (Social posts are only produced when the article was created with social posts enabled, so ask for them up front: “write the article and include social posts”.)
9. Troubleshooting
| Problem | What it means | Fix |
|---|---|---|
| ”Authentication required” or “Invalid API Key” | The key is missing or wrong | Re-check the key in your connector URL or header. Copy it fresh from the dashboard. In a Bearer header the value is Bearer YOUR_KEY. Do not include the word “Bearer” twice |
| ”Could not resolve the project” | The project name did not match exactly | Ask “list my AW projects” and use the name exactly as shown, or create the project in the dashboard first |
| ”region and output_language are required” | No project was given and no region or language was said | Mention them (“region US, American English”) or write for a project that has them saved |
| Article came out more expensive than expected | The smart defaults applied a premium model and 3 images | Say “standard model, no images” for the 2-credit version (see section 6) |
| “MCP is available on paid plans only” | Trial account | Upgrade to any paid plan |
| ”API only available for the Standard plan and above” | Seen on the direct REST API, not the connector | MCP works on any paid plan; the REST API needs Standard or above |
| ”No active plan” | Your subscription period has ended | Renew. If you cancelled, access runs to the end of the period you paid for |
| ”Insufficient Credits” | Article balance too low | Top up, or ask “how many credits do I have?" |
| "Insufficient AW Tokens” | Monthly premium-tool allowance used up | Wait for the monthly reset, or upgrade |
| ”Daily limit of N articles reached” | You hit your plan’s daily limit | Try again tomorrow. This counts articles created in the dashboard too |
| Assistant says the article is not ready | Still generating | Normal: articles typically take 3 to 10 minutes |
| Assistant says to check back later | The generation queue is busy | The article keeps generating on its own. Ask “is my article ready?” later in any chat, or watch the article list in your dashboard. It is only a failure if the status says “Failed (Refunded)“ |
| Status says “Failed (Refunded)“ | Generation failed | Your credits were returned automatically. Try again, or contact support if it repeats |
| Images are missing when your assistant previews the article | Nothing is wrong with the article. Preview panes inside AI assistants often block images loaded from other websites, so only the placeholder and its alt text show | The images are in the HTML. They appear normally once you publish the article, open the downloaded file in a browser, or view it in your AgilityWriter dashboard |
| Connector added but no tools appear | The client did not finish connecting | Reload or restart the client, and make sure the connector is enabled for the chat |
| Connector fails to add | Typo in the URL | It must be exactly https://mcp.agilitywriter.ai/mcp plus your key |
Still stuck? Contact AgilityWriter support with the exact error message your assistant showed you.
10. Privacy and security notes
- Your API key is only used to call the AgilityWriter API on your behalf. It is not stored by the connector between requests.
- Anyone with your API key can spend your credits. If a key leaks, generate a new one in the dashboard and update your connector settings.
- Articles created through the connector belong to your account like any other article and appear in your dashboard.
Still need help?
Browse the full help center or start writing on a $1 trial.